java.util.concurrent包相关讲解

原子变量
JDK1.5后,jUC.atomic 包下提供了常用的原子变量。常用的AtomicInteger,AtomicBoolean等都有,很像包装类。
- volatile保证内存可见性
- CAS算法保证数据的原子性(Compare-and-Swap)
- CAS算法是硬件对于并发操作共享数据的支持
- CAS包含了三个操作数:
- 内存中已经存在的值 V
- 预估值 A
- 更新值 B
- 当且接档 V == A 时, V = B, 否则不做任何操作。
volatile happens-before
happens-before 关系是程序语句之间的排序保证,这能确保任何内存的写,对其他语句都是可见的。
JMM为所有程序内部动作定义了一个偏序关系,叫做happens-before。要想保证执行动作B的线程看到动作A的结果(无论A和B是否发生在同一个线程中),A和B之间就必须满足happens-before关系。
当写一个 volatile 变量时,随后对该变量读时会创建一个 happens-before 关系。所以,所有在 volatile 变量写操作之前完成的写操作,将会对随后该 volatile 变量读操作之后的所有语句可见。
1 | // Definition: Some variables |
我们假设上面的两个代码片段有由两个线程执行:线程 1 和线程 2。当第一个线程改变 hasValue 的值时,它不仅仅是刷新这个改变的值到主存,也会引起前面三个值的写(之前任何的写操作)刷新到主存(happens-before具有传递性,即violate写之前的所有操作都会发生在violate读操作之前)。结果,当第二个线程访问这三个变量的时候,就可以访问到被线程 1 写入的值,即使这些变量之前被缓存(这些缓存的副本都会被更新)。
i++原子性问题:读-改-写
1 | int i = 10; |
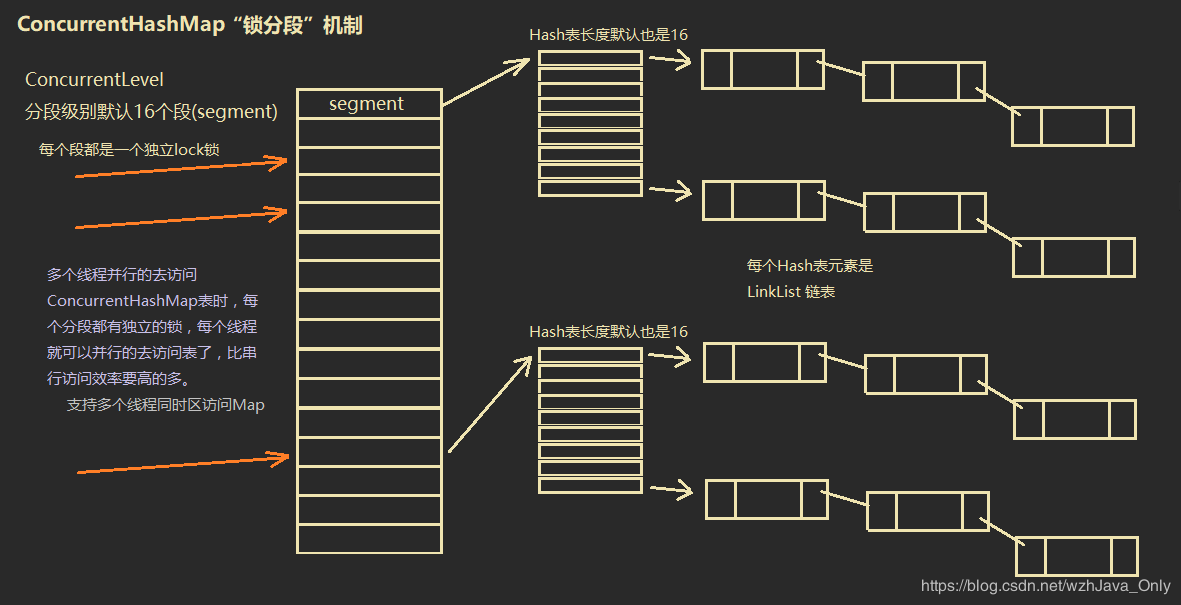
ConcurrentHashMap讲解
采用“锁分段”机制。在JDK1.8之前,采用segment方式来锁表。
下图为JDK1.8之前ConcurrentHashMap的设计方式。JDK1.8改为由synchronized + CAS算法控制并发安全。
HashTable的缺点
- 并行变串行(效率低下)
- 符合操作时,同样容易发生错误
- 例如:若不存在key,则put(key, value)。在执行if (!table.contains(key))之后,可能其他线程会进行put操作,产生错误。
CopyOnWrite机制(COW)
java.util.concurrent.CopyOnWriteArrayList;安全失败(fail—safe),util.Collection下的集合都是fast-safe,即遍历时不允许修改。
在多线程写入时,为该线程创建一份原数组的拷贝。线程修改Array时,不修改原数组,而是线程内存中的拷贝array。写入完成后再将新数组传递给内存中的原数组。(整个过程用ReentrantLock锁定,这样其他线程读取时,仍然是未修改的数据,这样就确保了数据读取的正确性)。
特点:添加操作多时,效率低下(每次添加时都需要将内存数组复制到线程内部,开销很大)。并发迭代(读取、非修改)操作多时效率很好。
常用AQS同步组件CountDownLatch & CyclicBarrier
CountDownLatch(闭锁,倒计时器)
CountDownLatch允许一个或多个线程一直等待,直到其他线程的操作执行完后再执行,也称闭锁,倒计时器。
1 | class LatchDemo implements Runnable { |
CyclicBarrier(循环屏障)
功能上与CountDownLatch十分类似,也是实现线程间的计数等待,但是具体功能要更多一些。
让一组线程到达屏障(也就是某一个同步点/语句)时被阻塞,直到最后一个线程到达屏障时,屏障才会开门,将所有已经拦截的全部(病句以示强调)线程放出去继续运行。
直白来说:CyclicBarrier强调的是n个线程,大家相互等待,只要有一个没完成,所有人都得等着。
1 | CyclicBarrier cb = new CyclicBarrier(int [, Runnable]); |
Semaphore (信号量)
控制某个资源可以被同时访问的数量。
1 | Semaphore semaphore = new Semaphore(20); |
Callable 和 Runnable的区别
Callable的实现(需要FutureTask配合接收返回值)
1 | // Callable可以定义返回值的泛型. |
ReentrantLock 与 锁(ReentrantLock与synchronized区别)
- ReentrantLock与synchronized区别
- 两者都支持可重入性,同一线程进入一次,锁计数器就+1。直到计数器为0时才释放锁。
- 锁的实现
- synchronized:JVM实现(操作系统实现)
- ReentrantLock:JDK实现(程序员写代码实现)
- 性能上现在已经很类似了
- 功能上
- ReentrantLock更灵活,因为都是自己实现的
- 可指定时公平锁还是非公平锁
- 提供了一个Condition类,可以分组唤醒需要唤醒的线程
- 提供能够中断等待锁的机制(基于自旋锁实现 ),lock.lockInterruptibly()
- ReentrantLock更灵活,因为都是自己实现的
同步锁 & 读写锁
多线程安全——同步锁lock
用于解决多线程安全问题的方式:
- synchronized隐式锁:
- 同步代码块
- 同步方法(这两个如果对应到一个实例变量中,实际上时一把锁。
- JDK1.5之后:
- 同步锁Lock(显式锁),需要通过lock()方法上锁,必须通过unlock()方法进行锁释放
1 | class Ticket implements Runnable { |
Condition控制线程通信
Condition接口描述了可能会与锁有关联的条件变量。这些变量在用法上与使用Object.wait访问的隐式监视器类似,但提供了更强大的功能。需要特别指出的是,单个Lock可能与多个Condition对象关联。为了避免兼容性问题,Condition方法的名称与对应的Object版本中不同
- wait - await
- notify - signal
- notifyAll - signalAll
Condition实例实质上被绑定到一个锁上。要为特定Lock实例获得Condition实例,需要使用其newCondition()方法。
1 | private Lock lock = new ReentrantLock(); |
读写锁 ReadWriteLock
写写 & 读写需要互斥,而读读不需要互斥。
1 | class ReadWriteLockDemo{ |
用两个int实现一个读写锁
1 | private int readcount = 0; |
线程池
提供了一个线程队列,队列中保存着所有等待状态的线程。避免了创建与销毁额外开销,提高了响应的速度。
ThreadPoolExecutor
- corePoolSize - 核心线程数量
- maximumPoolSize - 最大线程数
- workQueue - 阻塞队列,储存等待执行的任务
- keepAliveTime - 线程没有任务执行时最多保持多长时间终止
- unit - keepAliveTime的时间单位
- threadFactory - 线程工厂,用来创建线程
- rejectHandler - 当拒绝处理任务时的策略
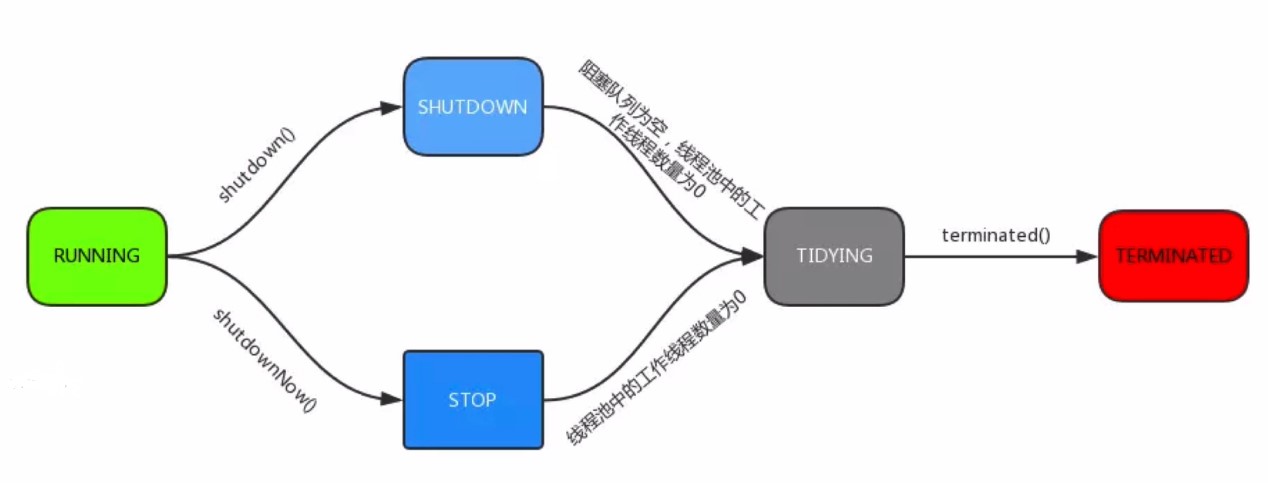
线程池的状态
常用方法
- execute() - 提交任务,交给线程池执行
- submit() - 提交任务,能够返回执行结果 Future
- shutdown() - 关闭线程池,等待任务都执行完
- shutdownNow() - 关闭线程池,不等待任务执行完
- TIDYING:所有任务都已终止
- TERMINATED:terminated()方法执行完后为该状态
线程池的体系架构
java.util.concurrent.Executor : 负责线程的使用与调度的根接口,但是不需要程序员手动创建,通过Executors工具类来创建即可,
|–**ExecutorService 子接口: 线程池的主要接口
|–ThreadPoolExecutor 线程池的实现类
|–ScheduledExecutorService 子接口:负责线程的调度
|–ScheduledThreadPoolExecutor :继承 ThreadPoolExecutor, 实现 ScheduledExecutorService
ThreadPoolExecutor的构造函数
- corePoolSize:核心线程数量
- maximumPoolSize:线程不够用时能够创建的最大线程数
- workQueue:任务等待队列(任务提交时,线程数量已经大于corePoolSize,则把该任务放进workQueue等待)
- keepAliveTime:线程池维护线程允许的空闲时间,线程数量大于corePoolSize时,若没有新线程提交,则核心线程以外的线程不会被立即销毁,而是等待keepAliveTime时间再销毁。抢占的顺序不一定,看运气
- threadFactory:创建新线程,Executors.defaultThreadFactory(),优先级相同、非守护
- handler:线程池的饱和策略。当线程池满了之后的策略
- AbortPolicy:直接抛出异常,默认策略
- CallerRunsPolicy:用调用者所在的线程来执行任务
- DiscardOldestPolicy:丢弃队列中最靠前的任务,并执行当前任务
- DiskcardPolicy:直接丢弃本任务
- 也可以实现RejectedExecutionHandler接口的自定义handler
Executors工具类
- ExecutorService newFixedThreadPool(int threadNums) : 创建固定大小的线程池
- ExecutorService newCachedThreadPool() : 缓存线程池,线程池的数量不固定,可以根据需求自动的更改数量。
- ExecutorService newSingleThreadExecutor() : 创建单个线程池。线程池中只有一个线程
- ScheduledExecutorService newScheduledThreadPool(int corePoolSize) : 创建固定大小的线程,可以延迟或定时的执行任务。
1 | newFixedThreadPool(int nThreads); // 指定工作线程固定数量的线程池 |
1 | public class ThreadPoolTest { |
AbstractQueuedSynchronizer - AQS
- 使用Node实现FIFO的双向链表队列(Condition是单向链表)。是创建锁或者其他同步装置的必要框架。
- 利用了一个int类表示状态(0 - 无线程获取锁,1 - 有线程获取锁)
- 可以同时实现排它锁和共享锁模式(独占、共享)
https://segmentfault.com/a/1190000008471362
原子类(AtomicXXX)
原子更新基本类型
使用原子的方式更新基本类型,Atomic包提供了以下3个类。 (CAS)
AtomicBoolean: 原子更新布尔类型。
AtomicInteger: 原子更新整型。
AtomicLong: 原子更新长整型。
以上3个类提供的方法几乎一模一样,以AtomicInteger为例进行详解,AtomicIngeter的常用方法如下:
int addAndGet(int delta): 以原子的方式将输入的数值与实例中的值相加,并返回结果。
boolean compareAndSet(int expect, int update): 如果输入的值等于预期值,则以原子方式将该值设置为输入的值。
int getAndIncrement(): 以原子的方式将当前值加1,注意,这里返回的是自增前的值。
void lazySet(int newValue): 最终会设置成newValue,使用lazySet设置值后,可能导致其他线程在之后的一小段时间内还是可以读到旧的值。
int getAndSet(int newValue): 以原子的方式设置为newValue,并返回旧值。
原子更新数组
通过原子的方式更新数组里的某个元素,Atomic包提供了以下的4个类: (CAS)
- AtomicIntegerArray: 原子更新整型数组里的元素。
- AtomicLongArray: 原子更新长整型数组里的元素。
- AtomicReferenceArray: 原子更新引用类型数组里的元素。
这三个类的最常用的方法是如下两个方法: get(int index):获取索引为index的元素值。
compareAndSet(int i,E expect,E update): 如果当前值等于预期值,则以原子方式将数组位置i的元素设置为update值。
原子更新字段类
不改变reference,而实改变reference里面的某个字段。
Atomic包提供了四个类进行原子字段更新:
- AtomicIntegerFieldUpdater: 原子更新整型的字段的更新器。
- AtomicLongFieldUpdater: 原子更新长整型字段的更新器。
- AtomicStampedFieldUpdater: 原子更新带有版本号的引用类型。
- AtomicReferenceFieldUpdater: 上面已经说过此处不在赘述。
这四个类的使用方式都差不多,示例代码如上一小节的AtomicReferenceFieldUpdater一样,要想原子地更新字段类需要两步。第一步,因为原子更新字段类都是抽象类,每次使用的时候必须使用静态方法newUpdater()创建一个更新器,并且需要设置想要更新的类和属性。第二步,更新类的字段必须使用public volatile修饰。
1 | package concurrency; |
阻塞队列(BlockingQueue)
阻塞队列(BlockingQueue)是一个支持两个附加操作的队列。这两个附加的操作是:在队列为空时,获取元素的线程会等待队列变为非空。当队列满时,存储元素的线程会等待队列可用。阻塞队列常用于生产者和消费者的场景,生产者是往队列里添加元素的线程,消费者是从队列里拿元素的线程。阻塞队列就是生产者存放元素的容器,而消费者也只从容器里拿元素。
- ArrayBlockingQueue :一个由数组结构组成的有界阻塞队列。(先进先出)
- LinkedBlockingQueue :一个由链表结构组成的有界阻塞队列。(默认和最大长度为Integer.MAX_VALUE)
- PriorityBlockingQueue :一个支持优先级排序的无界阻塞队列。
- DelayQueue:一个使用优先级队列实现的无界阻塞队列。
- SynchronousQueue:一个不存储元素的阻塞队列。每一个put操作必须等待一个take操作,否则不能继续添加元素。
- LinkedTransferQueue:一个由链表结构组成的无界阻塞队列。
- LinkedBlockingDeque:一个由链表结构组成的双向阻塞队列。